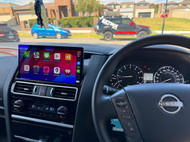
How to upgrade Nissan Patrol Y62 Infotainment System
Posted by Extnix on 5th Mar 2024
Did you just buy a falshy new Y62 without the latest infotainment features. Look no further!
Introducing our state of the art Extnix Y62 Nissan Patrol infotainment system with improved features, and bigger 13.1" screen.
Upgrading the factory radio head unit in your Nissan Patrol Y62 to the latest Extnix Android infotainment system can be a challenging task.
In this blog we will try to make it as simple as possible and we strongly recommend using
service of a qualified professional to install the audio system.
These instructions are for reference only. The correct and most appropriate procedure may vary depending on (without limitation) vehicle type, user experience, product specifications and/or changes in technology, laws, regulations or best practices.
Let us Start – Journey from Sad to Fab!
Start
- Safety First - Disconnect the negative battery terminal.
- Tools required - Pry tools and Philips Screw Driver, tesa/electrical tape and long nose plier.
- Pull down the silver/chrome/other bit from the gear stick to reveal the Pin.
- Take the pin out and secure it - Slide out the gear knob
- Use a plastic prying tool to lift the top centre console cover half way. There are 2 harnesses under it, which need to be disconnected before complete removal.
- Remove the side panels on each side of the factory radio. Move the driver and passenger seats to back (as much as possible). The inner panel under dash needs to come out first and then the whole panel slides out.
- Access to Nissan module and Bose AMP on either side of the dash – 8mm Nuts and 4 philips screws for the left module and similar for BOSE amp at the right side too.
- Move the left module and the Aircon module
- Move the Bose Amp in similar way. This may require a slight trim of the inner plastic.
- Connecting the new supplied harnesses
- Connecting the 360 CAM Wiring
- Reverse Cam Patch lead will connect to Port 7
- CanBus will connect to Port 4
- New unit may not full click – this is normal – tight in the screw.
- At this stage install the Centre console, connect the 3 harnesses under it and put the gear knob. Connect the battery ground terminal. You can now test the Unit, Camera/360 Cam, Aircon control, etc.
- Once test is completed and new Extnix Infotainment system is working. Turn the care off. Remove the Gear Knob and the Centre Console.
- Install side panels, centre console and gear knob. Extnix Infotainment System is now fully installed.
Thats it. Installation is finished.
Is time to Enjoy the Fab!
Want more details with end to end pictures pictures? Checkout our installational help page to download the coloured printout with pictures.
Questions? Please reach out to us – email: support@extnix.com.au

